
In this article: A phase-by-phase walkthrough of every decision you need to make — from choosing the right space and running wiring to selecting seats, treating acoustics, and finishing the room.
- Choose the Right Room
- Plan Your Screen and Projector Placement
- Design Your Seating Layout
- Run Your Electrical and AV Wiring
- Add Acoustic Treatment
- Lighting, Décor, and Final Touches
- Frequently Asked Questions
The single biggest mistake in a home theater build is completing the steps out of order — especially running AV wiring after walls close or selecting seats before locking in row dimensions. A structured build sequence prevents rework, keeps costs predictable, and produces a room that performs at the level you planned from the start.

This guide takes you through each phase in the order it must happen — from evaluating candidate spaces to final calibration and lighting scenes. Use it as a project checklist whether you are building from scratch or converting an existing room.
Quick Takeaways
• Sequence matters more than budget.
Running wiring before walls close and finalizing dimensions before ordering seats prevents the most expensive mistakes.
• Room dimensions drive every other decision.
Screen size, seat count, riser height, and acoustic treatment all flow from the room's width and length.
• A 10 × 14 ft room is the workable minimum for a single row.
Two rows with a riser need at least 12 × 22 ft to maintain proper sight lines and exit clearances.
• Acoustic treatment returns more value per dollar than most equipment upgrades.
An untreated room with premium speakers sounds worse than a well-treated room with mid-range gear.
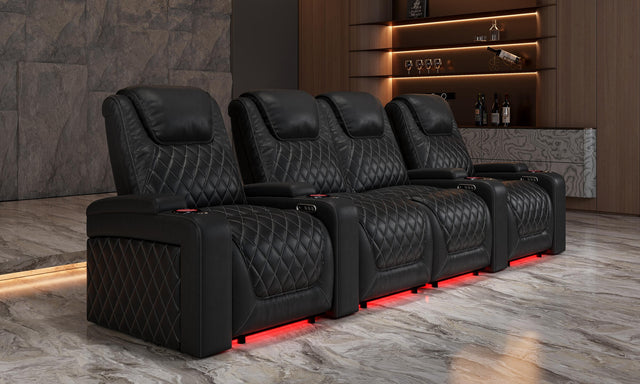
• Dedicated theater seating is equipment, not furniture.
Seat depth, row spacing, and recline angle are engineering decisions that affect every viewer's experience.
1. Choose the Right Room

Room selection sets a ceiling on everything that follows. A space that is too narrow limits screen size and row count; a room with too many windows fights light control year-round. Evaluate every candidate using these benchmarks before committing to one.
Minimum and recommended dimensions:
• Single-row minimum — 10 × 14 ft: Fits a 100-in screen and a row of three seats with roughly 12 in of side clearance per wall. Tight but functional.
• Comfortable single-row — 12 × 18 ft: Accommodates a 110–120-in screen, full row depth, and space for acoustic rear wall treatment.
• Two-row with riser — 12 × 22 ft: The back row needs 48–54 in of row-to-row spacing and a 12–18 in raised platform to clear sight lines over the front row's head level.
Width-to-length ratio ideally falls between 1:1.5 and 1:1.8. Rooms that approach square create bass resonance modes that are expensive to treat acoustically. Avoid ratios near 1:1 and 1:2 whenever you have a choice.
Additional factors to evaluate before selecting a room:
• Ceiling height: 8 ft is workable; 9–10 ft preferred for two-row layouts and ceiling-mounted acoustic cloud panels.
• Windows: Basement rooms with no exterior openings are ideal. Above-grade rooms require blackout shades or motorized curtains on every window and door light gap.
• HVAC noise: Ductwork rumble audible in the empty room will not be fixed by acoustic panels. Evaluate noise floor during room selection — not after walls are finished.
• Structural access: Confirm that ceiling joists can support a projector mount, that wall framing can accept in-wall speaker baffles, and that the floor can carry riser load before finalizing the space.
2. Plan Your Screen and Projector Placement

Screen placement is determined by the room's depth, the optimal viewing distance, and the projector's throw ratio. Lock these numbers in before framing any soffits or built-in cabinetry — relocating a projector mount after drywall requires a full ceiling repair.
| Room Depth | Recommended Screen | Notes |
|---|---|---|
| 14–16 ft | 100–110 in diagonal | Front row at approximately 10–11 ft from screen |
| 16–20 ft | 110–120 in diagonal | Works for single or double row with projector at 14–16 ft |
| 20–24 ft | 120–135 in diagonal | Two rows with riser; long-throw projector or UST |
SMPTE recommends a minimum horizontal viewing angle of 30° from the center seat to the screen edges. THX recommends 36°. Use these numbers as a floor, not a ceiling. A screen that feels large in a lit room almost always feels correct once the room goes dark and the image fills peripheral vision naturally.
Calculating projector throw distance: Multiply the screen's diagonal measurement by the projector's throw ratio. A lens with a 1.6:1 throw aimed at a 120-in screen needs approximately 16 ft from lens to screen surface. Add 12–18 in for the projector body behind the lens when calculating ceiling mount position and soffit clearance.
If the room cannot achieve the required throw distance, a short-throw or ultra-short-throw (UST) projector mounted near the screen solves the problem without changing the room layout. Plan the mount position and cable routing before framing so you do not have to fish through finished walls later.
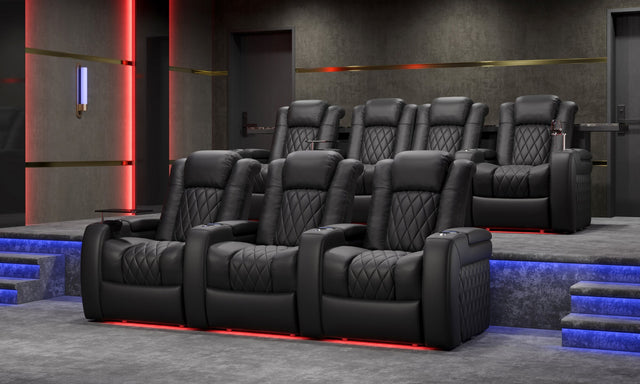
3. Design Your Seating Layout

Seating layout follows screen placement directly. Once you know where the screen sits and the front row's ideal eye-level viewing distance, every other seat dimension follows from those anchor points. See the full Layout and Row Spacing Guide for step-by-step calculations.
Critical spacing numbers:
• Front row to screen: Viewing distance should be 1.2–1.5× the screen's diagonal. For a 120-in screen, place the front row's eye position 12–15 ft from the screen surface.
• Row-to-row spacing: 48 in minimum between seat backs in adjacent rows. 54 in provides enough depth for full power recline without the occupant's feet reaching the seat back in front.
• Side aisle clearance: 12 in from the outermost seat edge to the wall or built-in cabinetry. 18 in if the side aisle also serves as a primary egress path.
• Riser height for second row: 12–18 in in rooms with 8–9 ft ceilings. Before building, confirm that the rear row's seated eye level clears the headrests of the front row. Power headrests that adjust vertically change this calculation — check both the fully up and fully down positions.
Seat count is constrained by room width. Each theater seat body spans 22–28 in; shared armrests add 5–7 in between seats. A 12 ft room can fit a row of three with 12–15 in of side clearance on each wall. Refer to How Many Seats Do You Need for a complete width-to-seat-count calculation table.
4. Run Your Electrical and AV Wiring

Rough-in all electrical and AV wiring before any drywall goes up. This is the one phase that is genuinely difficult to undo after walls close. Budget an extra half-day here to pull spare conduit runs — the cost of the extra conduit is trivial compared to the cost of fishing new cable through finished walls later.
Dedicated circuits to rough in:
• Projector circuit — dedicated 20A: Place the outlet at the projector ceiling-mount location. A dedicated line eliminates the noise that shared circuits can inject into the image and eliminates the risk of tripping a shared breaker at a critical moment.
• AV receiver circuit — dedicated 20A: High-draw receivers pull 600–1,200W peak. Sharing with other loads on a 15A circuit risks tripped breakers at reference volume levels.
• Seat row outlets — 20A per row: Run an outlet box at floor level at each seating row for power recliner actuators and USB charging. Keep this circuit separate from audio — actuator noise can be audible on shared circuits at low listening levels.
• Lighting circuits — separate dimmer zones: Aisle lighting, bias lighting behind the screen, and overhead fixtures each warrant their own dimmer circuit. Use 0–10V compatible dimmers if you want smooth fade-to-black capability.
AV cable runs to pre-wire before drywall:
• HDMI 2.1 in-wall rated — projector run: Pull two cables from the equipment rack location to the projector ceiling mount. One active, one spare — the spare costs almost nothing now and saves hours later.
• Speaker wire — 12 AWG for LCR and surrounds: 14 AWG is acceptable for height channels. Label both ends with position name (e.g., "Front Left," "Surround Right") before closing walls.
• CAT6 to all equipment locations: IP-controlled equipment, streaming devices, smart lighting controllers, and projectors all perform more reliably on hardwired ethernet than on Wi-Fi in an RF-noisy AV environment.
5. Add Acoustic Treatment

Acoustic treatment is the most underinvested phase of most home theater builds — and the one with the highest return when done correctly. A room that sounds bad makes every piece of equipment in it perform below its potential. Treatment addresses two distinct problems: early reflections that smear imaging, and low-frequency buildup in corners.
Absorption panels — first reflections: Place 2-in thick rigid fiberglass or mineral wool panels at the first reflection points on the side walls. These are the locations where a mirror held flat against the wall would reflect the nearest speaker back to the center listening position. Ceiling cloud panels go directly above the primary seating row. These panels control early high-frequency reflections that arrive milliseconds after the direct sound and make the room sound acoustically confused regardless of speaker quality.
Bass traps — corner treatment: Place floor-to-ceiling bass traps in every room corner, beginning with the four front corners flanking the screen. Low-frequency energy accumulates at room boundaries and causes bass to sound one-note and slow regardless of subwoofer output capability. Use 4-in thick semi-rigid mineral wool or fiberglass for meaningful absorption in the 80–250 Hz range that causes the most audible problems in home theater rooms.
Diffusion — rear wall: The wall behind the seating position benefits from diffusion rather than absorption. Diffusors scatter energy in multiple directions instead of eliminating it, preserving the sense of room space and avoiding the acoustically dead quality that over-damped rooms produce.
Coverage targets by surface:
• Side walls: 25–35% coverage with absorptive material. Below 20% produces audible flutter echo on percussive material; above 45% makes dialogue sound unnatural.
• Ceiling: One cloud panel above the primary row minimum. Full ceiling treatment if budget allows.
• Rear wall: Diffusion preferred. A mix of 50% diffusion and 50% absorption at the rear wall balances energy return without over-damping.
6. Lighting, Décor, and Final Touches

Lighting and finishing details are the last phase to complete — but they must be planned early because they depend on electrical rough-in decisions made before drywall. A room that feels purpose-built rather than converted is distinguished by intentional lighting layers and consistent material choices throughout.
Lighting layers and their functions:
• Bias lighting behind the screen: LED strip lights at 6500K, calibrated to approximately 10% of screen average brightness. Reduces eye strain during long viewing sessions and improves perceived screen contrast by establishing a reference white point at the edges of the image.
• Aisle lighting at seat rows: Low-level LED strips at the base of seat rows or along riser stair nosings. These must remain on at a very low level during viewing without washing out the screen — keep them below 0.5 lux at seat level.
• Overhead dimmers with scene presets: A scene controller that stores "pre-show" (50%), "credits" (15%), and "all-dark" (0%) presets eliminates the need to find a light switch after a movie starts. Program these before the first viewing session.
Wall and ceiling finish: Paint all four walls and the ceiling in a flat dark finish — Sherwin-Williams "Tricorn Black" or equivalent. The ceiling above and to the sides of the screen is especially critical: even a mid-gray ceiling reflects enough projector spill to wash out black levels at lower brightness settings. Satin or semi-gloss finishes cause visible hot spots; flat finish is the only correct choice for any surface within the projector's beam path.
Décor and material selection: Fabric-wrapped acoustic panels can match the room's color scheme and serve double duty as wall treatment. Velvet and suede-finish upholstery fabrics are absorptive in the mid-to-high frequency range and visually consistent with a theater aesthetic. Avoid glass, mirrors, polished metal, and any hard-surface décor elements near first reflection points — they undermine the acoustic treatment installed in the previous step. For seating, browse the full home theater seating collection to find configurations that fit the row dimensions you finalized in step three.
Frequently Asked Questions
What is the smallest room that can work as a home theater?
A 10 ft × 14 ft room can fit a 100-in screen and a single row of three seats with minimal side clearance. Anything narrower than 10 ft is very difficult to optimize — at that width you cannot achieve adequate first-reflection treatment on both side walls simultaneously. In very compact spaces, a large-format 85–100-in TV is often a better choice than a projector.
Do I need a contractor, or can this be a DIY build?
Electrical rough-in and structural modifications (riser framing, load-bearing soffit construction) should involve licensed professionals. Acoustic panel installation, painting, and seating placement are accessible DIY tasks for anyone comfortable with basic tools. Final projector calibration is a specialized skill — many homeowners hire an ISF-certified calibrator for a final pass after the room is otherwise complete.
How much does a home theater room typically cost to build?
A functional single-row theater with a mid-range projector, basic acoustic treatment, and quality seating typically runs $8,000–$15,000 total. A fully finished two-row room with professional calibration, custom acoustic panels, and premium seating often costs $20,000–$50,000+. See the Home Theater Budget Guide for a detailed cost breakdown by category and tier.
What is the correct order of steps for a theater build?
Room selection → dimension and layout planning → electrical and AV rough-in → framing (risers, soffits, in-wall speaker baffles) → drywall and paint → acoustic treatment installation → equipment installation and calibration → seating placement → final lighting scene programming. Seating should be among the last items placed so it does not obstruct installation work in the earlier phases.
How important is acoustic treatment compared to equipment quality?
Acoustic treatment is among the highest-return investments in any theater build. An untreated room with $10,000 speakers will sound worse than a well-treated room with $3,000 speakers. Bass buildup and early reflections degrade intelligibility and imaging far more than modest differences in speaker or amplifier quality. Budget at least $500–$1,500 for treatment regardless of your total equipment spend.
Do power theater seats need a dedicated electrical circuit?
Power recliner actuators draw relatively modest current — typically 1–2A per seat — but running that load through audio equipment circuits can inject noise. A dedicated 20A outlet circuit at each seat row, separate from your AV equipment circuits, prevents interference and provides capacity for USB charging accessories. Pre-wiring this during rough-in costs almost nothing compared to adding it after the room is finished.
What flooring works best acoustically in a home theater?
Carpet is the acoustically superior choice — it absorbs floor reflections and reduces footfall noise between rows. If you prefer hard flooring for easier maintenance, place a large area rug covering the full seating zone. Hard floors with no floor coverage create strong reflection points directly below the listening position that counteract the wall and ceiling treatment you have installed.
How do I choose the right seats for the room I have?
Start with your room's width and the number of seats per row you want, then verify the total row width against available wall clearance. Next confirm the seat's reclined depth fits within your row-to-row spacing. The How to Choose Home Theater Seats guide walks through the full selection process, including seat sizing, leather grade, and feature tiers by room type.