

In this article: Learn when a theater riser is actually necessary, how to size it correctly for your seats and room, what to build it from, and how to plan lighting and electrical from the start.
- What a Theater Riser Does (And When It's Worth It)
- When a Riser Is Necessary
- How High the Riser Should Be
- How Deep the Riser Should Be
- What to Build It From
- Electrical, Lighting, and Safety Considerations
- Frequently Asked Questions
A theater riser is a raised platform that elevates your second (or third) row of seating so every viewer has a clear sightline to the screen above the heads of the row in front. For single-row rooms, a riser is rarely necessary. For two-row layouts, it is almost always the difference between a true cinema experience and a room where half your guests are constantly craning their necks.

Getting the riser right requires more than just stacking a platform behind your front row. Height, depth, structural integrity, and electrical planning all interact — and mistakes here are expensive to fix after the fact. This guide covers everything you need to measure, build, and finish a riser that works for your specific seats and room.
Quick Takeaways
• One row rarely needs a riser; two rows almost always do.
If a second row of seated viewers can see over the heads of the front row without elevation, your screen is already high enough — but that is uncommon in most room proportions.
• Riser height is calculated, not estimated.
Measure your seat's eye height and your screen's bottom edge, then work backward — guessing typically results in a riser that's 4–6 inches too short.
• Riser depth must fit your seat's fully reclined footprint.
The most common riser mistake is building a platform that's too shallow, which forces the front legs of reclining chairs over the edge.
• Build structural from the start.
A riser will hold hundreds of pounds of seating and occupants for years — plywood over a framed base is the right approach, not MDF or unframed panels.
• Plan electrical before you close the walls.
Under-riser LED lighting and power outlets at seat level are far easier to run before carpet and trim go in than after.
1. What a Theater Riser Does (And When It's Worth It)

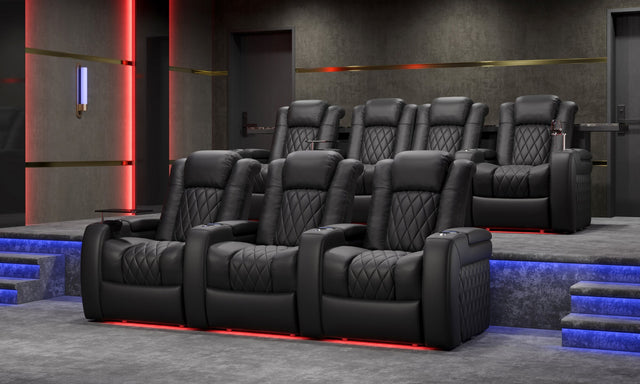
A riser solves a single problem: blocked sightlines. When a second row of seats sits on the same flat floor as the first row, viewers in the back are looking at the backs of heads, not the screen. Raising the rear row by 12–18 inches (depending on seat height and screen placement) restores a direct line of sight for every seat in the room.
A riser also does something subtler — it creates a visual separation between rows that makes the room feel more intentional and finished, closer to a commercial cinema than a living room arrangement.
When a riser is worth building
• Two rows, standard ceiling height (8–10 ft): Almost always necessary. The front row will block rear-row sightlines unless the screen is mounted unusually high.
• Two rows, high ceiling (11+ ft) with screen elevated to 48+ inches from the floor: Sometimes avoidable if eye-level calculations confirm clearance, but most builders still prefer the elevated row for comfort and aesthetics.
• Three rows: Always requires at least one riser; most three-row builds use a stepped platform with two rise levels.
• Single-row rooms: No riser needed. Focus budget on seating quality instead — see the How to Choose Home Theater Seats guide for single-row priorities.
When you might skip it
A riser is not worth building if your room layout is uncertain, you're in a rental, or you expect the room to change use. In those cases, a single front row of premium seating delivers more value than a permanent structural addition. For permanent dedicated rooms, the riser investment almost always pays off in viewing quality and resale appeal.
For a broader look at how row count affects the entire room plan, see the Layout and Row Spacing Guide.
2. When a Riser Is Necessary

The practical test is simple: seat someone in your planned second-row position and have them look at where the screen will be. If their sightline clears the top of the front-row headrest with room to spare, you have options. If it doesn't — or if it barely clears — a riser is necessary.
The sightline calculation
A rough field check:
• Seated eye height: Most adults seated in a recliner have their eyes approximately 42–46 inches from the floor.
• Front-row headrest top: Measure the height of the fully upright headrest from the floor — typically 48–54 inches for most home theater chairs.
• Screen bottom edge: If the screen's bottom edge is below the headrest top, rear-row viewers need elevation to see it without obstruction.
A 12–18 inch riser typically resolves the sightline issue for standard row spacing (4–5 ft between rows) and standard seat heights. Taller seats or closer row spacing may require more rise. Your seat dimensions are the most important starting variable — confirm them before building.
When ceiling height limits your options
An 8-foot ceiling with a 16-inch riser leaves only 6 feet 8 inches of headroom on the platform — workable for most people, but tight. If ceiling height is a constraint, consider:
• Lowering front-row seat height by choosing a lower-profile seat model for the first row.
• Raising the screen higher on the wall, which reduces the required riser height.
• Increasing row spacing to create a more gradual sightline angle, which also reduces required riser height.
3. How High the Riser Should Be

Riser height should be determined by sightline geometry, not by convention. The goal is to raise rear-row eye level high enough to see the entire screen above the front-row headrests — with a few inches of comfortable clearance, not just a pixel-thin line of sight.
Standard riser height ranges
| Scenario | Typical riser height | Notes |
|---|---|---|
| Two rows, 4–5 ft row spacing | 12–16 in | Most common configuration; works with standard ceiling heights |
| Two rows, 3–4 ft row spacing | 16–20 in | Tighter spacing requires more elevation to achieve clearance |
| Three rows (second riser) | Additional 12–16 in | Each additional row typically needs a similar rise above the previous |
| Tall seats (headrest 52+ in) | 16–20 in | Taller seats require more elevation for rear-row clearance |
How to calculate your specific riser height
Work through these three measurements:
• Seated eye height of rear viewer: Measure or estimate based on your seat's seat-height dimension. Add typical eye-to-seat cushion height (~20 inches for most adults).
• Front-row headrest height: The maximum height point of your front-row seat's headrest from the floor.
• Required elevation: The riser should raise the rear row's eye level to at least 4–6 inches above the front-row headrest top for comfortable sightline clearance.
Example: Front-row headrest top is 52 inches from the floor. Rear viewer's seated eye height (without riser) is 44 inches. Required elevation: at minimum 52 − 44 + 5 inches of clearance = 13 inches of riser height. Round up to 14–16 inches for comfortable margin.
Ceiling height check
Always verify clearance before finalizing riser height. Subtract your riser height from your ceiling height, then subtract seated-height of the tallest seated occupant (approximately 52–56 inches for most adults). Aim for at least 12 inches of clearance above the tallest seated person's head on the platform.
4. How Deep the Riser Should Be

Riser depth is where most DIY builds go wrong. Builders measure the seat's upright footprint and build to that — then discover that when the seat reclines, the footrest extends past the front edge of the riser, and either the front legs overhang or the seat tips forward slightly.
Always measure the fully reclined footprint
Your seat manufacturer should publish a "fully extended" or "reclined depth" specification. If not, place the seat on a flat surface, fully recline it, and measure from the back of the base to the front tip of the extended footrest. Add 4–6 inches of margin beyond this measurement as your minimum riser depth.
Riser depth reference ranges
| Seat configuration | Minimum riser depth | Notes |
|---|---|---|
| Single seat (no recline) | 36–40 in | Rarely used for theater risers; listed for reference |
| Power recliner (standard) | 52–60 in | Most power recliners extend 18–24 in beyond the seat base when fully open |
| Power recliner (large frame) | 60–66 in | Oversized or wide-body seats need additional depth margin |
| Row of 3 (side-by-side units) | Same depth — width adds, depth does not change | Width equals combined seat widths plus any console widths |
Front edge and toe kick clearance
Build a recessed toe kick (3–4 inches high, 3–4 inches deep) at the front face of the riser. This is a standard finishing detail that makes the step up more comfortable and prevents the front edge from feeling like a tripping hazard. Carpet the toe kick face to match the riser deck.
5. What to Build It From
A riser is a permanent load-bearing structure. It will hold several hundred pounds of seating plus occupants for years, and it should be built accordingly. This is not the place to cut costs on materials.
Recommended construction approach
• Frame with dimensional lumber (2×6 or 2×8): Build a rectangular frame with cross-members at 16 inches on center. This is the same method used for floor framing and provides a solid, rattle-free base that won't flex underfoot.
• Deck with 3/4-inch plywood (two layers): A single layer can feel slightly springy under concentrated load. Two layers of 3/4-inch plywood glued and screwed together create a stiff, solid deck surface that won't develop squeaks over time.
• Finish with carpet or hardwood: Carpet (matching or complementing your room) is the standard finish — it absorbs sound, feels finished, and is forgiving. Hardwood works but adds cost and can produce more noise from movement.
• Avoid MDF for structural members: MDF compresses under sustained load and does not hold screws well over time. It can be used for cosmetic trim panels but not for the frame or deck.
What not to use
| Material | Use it? | Reason |
|---|---|---|
| 3/4-in plywood (single layer) | Acceptable | Minimal deflection for most loads; two layers preferred |
| 3/4-in MDF (deck) | No | Compresses under point loads; screws pull through over time |
| 1/2-in plywood | No | Too flexible for deck use under heavy seating |
| Cinder block / hollow-core stacking | No | Not stable or level enough for seating loads |
| 2×4 framing | Marginal | Works for low risers (under 10 in); 2×6 is preferred for 12+ in height |
Securing the frame
If your riser sits on carpet over concrete (a common basement scenario), it is typically not attached to the floor — its weight and the weight of the seating keep it stable. If it sits on a hardwood or tile floor, non-slip pads under the frame base prevent any movement. Anchoring to the wall is an option for very tall risers (18+ inches) or if local building codes require it for habitable structures.
6. Electrical, Lighting, and Safety Considerations

Electrical planning for a riser is easiest done before carpet and trim are installed — but many builders treat it as an afterthought and end up fishing wires through finished walls. Planning three things upfront saves significant rework later.
Under-riser LED strip lighting
LED strip lighting mounted along the underside of the riser's front nose edge is the single most impactful lighting addition in most home theaters. It serves two purposes: ambient lighting for the room during viewing (easier on the eyes than bright overhead lights) and a step indicator that helps people navigate in a dark theater without tripping on the riser edge.
• Placement: Mount the LED strip on the underside of the front fascia, facing down toward the floor, set back 1–2 inches from the front edge so the strip is not visible from seated positions.
• Color temperature: Warm white (2700–3000K) or amber/dim-to-warm strips work best in a theater environment — they don't create competing light that washes out the screen.
• Control: Connect to a smart dimmer or a scene controller so you can dim or change the lighting from your seat without getting up.
Power outlets on the riser
Adding one or two outlets on the side face or inside the riser (accessible from seat positions) allows you to plug in seat-level power without visible cords running to the baseboard. This is especially useful for charging cables at armrests or for any seat accessories. Run the outlet circuit before the riser deck is carpeted.
Safety and riser edge
• No sharp edges: Round all exposed plywood corners with a router or sandpaper before finishing. Carpet alone does not fully protect against a sharp-cornered edge in the dark.
• Consistent step height: If your riser has more than one step level (three-row builds), keep step height consistent and avoid any step that is significantly taller than the others — inconsistency is a tripping hazard.
• Carpet the nose edge securely: Use a stair-nose molding or carpet stapled tightly over the front edge. Loose carpet on the step nose is the most common safety issue in finished risers.
• Adequate lighting: The LED strip under the riser edge is not just aesthetic — it is a safety feature. Make sure it is always on whenever people are moving in the theater, even at low brightness.
Integrating with home theater control systems
If your theater uses a control system (Lutron, Control4, RTI, or a simpler smart home hub), connect your riser lighting to it from the start. Tying LED dim level to your viewing mode (full bright for "intermission," 20% for "watching," off for "sleep") is a small effort upfront that makes the room dramatically easier to use day to day.
For broader room planning guidance, see the Home Theater Room Setup Guide.
Frequently Asked Questions
Do I need a riser if I only have one row of seats?
No. A single row has no sightline problem to solve — no one is sitting behind it. Spend that budget on better seats or a larger screen instead. See How to Choose Home Theater Seats for single-row priorities.
How high should a home theater riser be?
Most two-row builds use a 12–18 inch riser. The exact height depends on the front-row seat's headrest height, the rear viewer's seated eye height, and the row spacing. Calculate from actual measurements rather than assuming a standard height will work.
How deep does a theater riser need to be?
At minimum, the riser depth must equal the seat's fully reclined footprint plus 4–6 inches of margin. For most power recliners, that means 52–62 inches. Always confirm using the seat's published specifications before building.
What is the best material to build a theater riser from?
Frame with 2×6 or 2×8 dimensional lumber at 16 inches on center; deck with two layers of 3/4-inch plywood glued and screwed together. Finish with carpet. Avoid MDF for structural components — it compresses under sustained load and does not hold fasteners well over time.
Should I put LED lighting on my riser?
Yes — under-riser LED strip lighting is one of the most practical additions to any theater build. It provides ambient viewing light, functions as a step indicator for safety, and connects easily to a smart home or scene controller for hands-free operation.
What seats work best on a riser?
Any home theater seat works on a properly sized riser, but power recliners with consistent footprint dimensions are the easiest to plan around. Browse the full Home Theater Seating collection for options, or see the Tuscany vs. Barcelona vs. Oslo comparison to narrow down models.
How do I plan row spacing with a riser?
Row spacing (front-to-front of seats) should be at least 48 inches for comfortable access, with 54–60 inches preferred. The riser step itself typically occupies 10–14 inches of horizontal space at the front edge — factor this into your row depth calculations. The Layout and Row Spacing Guide covers this in full.
Do I need to attach the riser to the floor or wall?
For most residential builds, no. The combined weight of the framed platform and seating is typically sufficient to keep it stable on carpet. For very tall risers (18+ inches) or smooth floor surfaces, add non-slip pads to the base frame. Check local building codes if the riser is part of a permitted renovation.